Editor’s Note: This post was previously published on NEJM Resident 360, a product of NEJM Group, a division of the Massachusetts Medical Society.
Imagine the crisp starched fabric and the bright reflection of the afternoon sun as you run your index finger over the embroidered writing, “M.D.” This is the moment you have been waiting for: Donning your long white coat, punctuated by those two beautifully embroidered letters. You are now a doctor.
Your long medical school training — including hours of observing interns, residents, and attendings — has finally paid off. You can now diagnose and treat patients, prescribe medications, run family meetings, and perform procedures and surgeries. But, do you know how to teach your new students?
Despite the hours spent gaining medical knowledge and skills training, chances are that little time was spent preparing you to teach. Yet, on day one you will be expected to do just that. So, how do you prepare for this role? In this blog post, we review high-yield skills and behaviors of effective clinical teachers.
What Do We Know About Adult Learners?
Think about your time in medical school: Which teachers were you drawn to? Who kept your attention the longest? Where did you learn the most and how did you retain that information? Chances are your best teachers were the ones who facilitated your learning, rather than simply lectured, and kept you engaged through activities or small group discussion. As you embark on your new role as teacher, keep in mind the following key concepts about teaching adults:
- Relate teaching to experiences: Incorporate the learner’s experiences and skills into your teaching and relate your teaching to the learner’s clinical experiences to help facilitate understanding and learning.
- Allow active and relevant engagement: Engagement can be achieved with effective use of clinical questions, small group sessions with peer discussion, role playing, or quizzes. Adults can best learn and retain information if they are involved in the teaching process. Consider using peer-to-peer teaching to facilitate learning whenever possible.
- Nurture a safe learning environment: Your teaching efforts will not be effective if the learner does not feel comfortable.
How to Be an Effective Clinical Teacher
The Five-Step “Microskills” Model of Clinical Teaching is a helpful guide to facilitate development of practical clinical teaching. The five microskills (get a commitment, probe for supporting evidence, teach general rules, reinforce what was done right, and correct mistakes) are explained below:
1. Get a commitment
- “Diagnose” the learner: Before you start teaching, investigate the depth of your learner’s knowledge. You would not want to talk about ordering a CT scan with contrast if he/she already knows to do this. How do you “diagnose” the learner? Start by getting a commitment.
Example: “John, what do you think is going on in this patient?”
“How do you put this patient’s history and exam together?”
- Instill ownership: Asking the learner to commit to a diagnosis or plan (“put their money down”) serves two main purposes: It instills ownership for the learner and allows you to diagnose the learner (i.e., observe thought process, assess errors in thinking, and recognize gaps in knowledge or skill).
- Create a safe learning environment: Let learners know you will be asking questions of them. Be sure the purpose of your questions is to help the learner and understand how much they know. Be supportive as you help them discover the correct answer. Show your own vulnerability; revealing your own knowledge gaps and uncertainties fosters an environment where it is ok to say “I don’t know.”
- Prepare in advance: I am sure you have witnessed amazing clinical teachers and wondered how they know so much. The secret is that great clinical teachers prepare in advance for the teaching session. Don’t worry about being a content expert, prepare. Read UpToDate, perform a brief literature search, or review NEJM Resident 360 before the teaching session.
- Prepare a teaching script: To prepare, put together a teaching script to outline your approach to the topic and key teaching points (see example below); teaching scripts can be revised and used again in the future in similar clinical scenarios. As part of this preparation, plan the time you can commit to the teaching session, the level of your learners, the learning points you hope to make, and the questions you are going to ask to solidify those points.
Example: Imagine you are a resident supervising two interns and two medical students in the hospital. Your team is admitting a young woman with chest pain and shortness of breath. You want to teach about the workup and management of pulmonary embolisms. How do you think about teaching this topic?
Sample 20-Minute Teaching Script
Topic: Approach to and Treatment of Pulmonary Embolism (PE)
Goals: The goal of this session is to learn about PE and explore the workup and management of an inpatient with symptoms suggestive of PE.
Learning Objectives: After this session, participant will be able to:
- Describe the common symptoms and physical manifestations of PE
- Propose an algorithm for workup in a patient with chest pain suggestive of PE
- Explain the difference between a CT-angiography and V/Q scan in the diagnosis of PE
Sample Teaching Plan
| # Minutes Allotted | Activity |
|---|---|
| 2 | Case Review – 30-yo-woman G1P1 admitted with chest pain and SOB |
| 5 | Get Commitment Probe for supporting evidence Group discussion regarding thought process and approach to workup and management |
| 10 | Teach General Rules
|
| 3 | Summarize and Debrief (Correct mistakes and reinforce what was done right)
|
2. Probe for supporting evidence
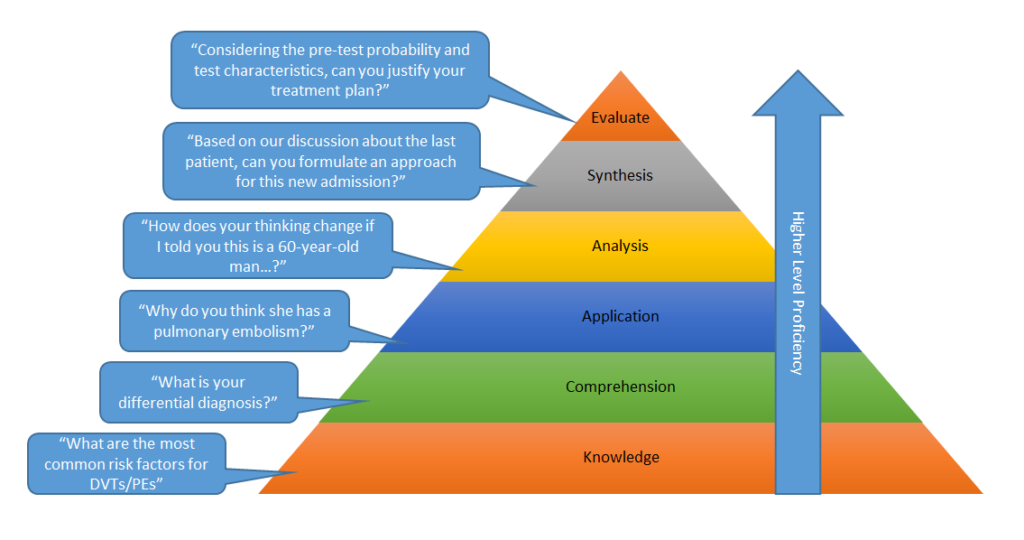
- Ask the right kind of questions: Once you have a commitment, probing for more details is essential to help learners expand their thinking and allows you to assess the depth of their knowledge. Asking the right type of questions is critical. You want questions that will facilitate deeper thinking rather than simply teaching at the learner. (See Bloom’s Taxonomy of Learning Domains)
- Guide the learner to the correct answer: Which of the following questions are most likely to foster discussion and allow you to assess the learner?
- “What are five risk factors for developing a pulmonary embolism?”
- “Why do you think this young woman has a pulmonary embolism?”
- “What is the treatment of choice for a pulmonary embolism?”
- “How does your thought process change if this is a 60-year-old man with a smoking history?”
While helpful in identifying specific knowledge points, “what” questions generally result in brief answers that are either right or wrong. Learners are hesitant to answer “what” questions because they fear being wrong in front of you or their peers. “How” and “why” questions allow a learner to reason through a problem and you to better understand their thought process. In addition, “how” and “why” questions provide you with the opportunity to guide the learner to the correct answer by redirecting them through further inquiry. In doing so, you allow the learner to identify their own knowledge gaps (a concept called cognitive dissonance).
Furthermore, “how” and “why” questions help the learner to progress up Bloom’s Taxonomy of Learning Domains, moving from simply remembering facts, a low level proficiency, to applying and analyzing the data, a much higher skill level that enhances understanding and retention.
Bloom’s Taxonomy of Learning Domains
Ask the right questions to guide a learner up proficiency levels.
 (Adapted from Bloom BS et al. Taxonomy of educational objectives: The classification of educational goals. Handbook I: Cognitive domain. New York: David McKay Company, 1956.)
3. Teach general rules
This microskill is the cornerstone of your teaching encounter. Everything you have done thus far leads to this moment:
– You laid the groundwork by creating a safe learning environment.
– You obtained a commitment from your learner.
– By rooting the teaching in clinical care, you engaged the learner through relevance to daily practice.
– By probing for evidence, you expanded the thinking of the learner, generated cognitive dissonance, and assessed the learner’s level of understanding.
– As a result, you undoubtedly uncovered gaps in medical knowledge or thought process.
– Now you can use this gap to advance the learner’s understanding.
- Provide focused learning points: Teaching should be founded in clinical care. Interns are busy and trying to absorb a lot of information; didactics that are not relevant are unlikely to lead to meaningful retention. Similarly, a 30-minute discussion in the middle of rounds is more likely to lead to frustration than learning. Provide focused learning points that are relevant and broadly applicable. In this setting, “pearls” rather than lengthy didactics are most fruitful.
Example: “For patients who have a confirmed diagnosis of pulmonary embolism, the length of anticoagulation is dependent on whether the embolism was provoked.”
“Patients with pulmonary embolism usually describe sharp chest pain which is worse with inspiration. The physical exam is often notable for tachycardia and rapid shallow breathing.”
- Consider the time and place: When planning the teaching encounter, consider the right time and place for teaching. Start rounds with 5 to 10 minutes of teaching rather than saving it for later in the day. Early in the day is a high-yield period when the mind is still fresh and before everyone gets too busy.
- Summarize: Finally, summarize learning points before leaving for the day. Ask if any points were confusing or if the learner wants to be taught more about any topics. By providing the time and space for learners to reflect, you allow them to consolidate the information, leading to retention. Also, use this conversation as the platform for your teaching the next day. Return to prior teaching points periodically to solidify understanding and promote long-term retention (referred to as spaced-learning).
4. Reinforce what is done right
- Debrief: Now that you accomplished your goal of teaching about anticoagulation and the manifestations of pulmonary embolism, it is time to debrief with your learner. The first step is to make sure your learner knows what they did right.
Example: “I am glad you considered alternative causes of this patient’s chest pain, it is important that we do not anchor too early on a diagnosis for risk of missing an alternate etiology.”
- Provide positive feedback: Positive feedback should be specific and encourage the learner to continue a particular behavior. You want to encourage good behaviors that the learner can repeat. Consider praising a learner in front of the group; doing so disseminates positive behaviors and nurtures the learner-teacher relationship.
5. Correct mistakes
- Provide constructive feedback: Next, you want to provide constructive feedback to correct any misconceptions. Failing to provide this feedback will do a disservice to your learner because these errors are likely to be repeated. Moreover, if you do not correct errors that occurred in front of other learners, you risk teaching the wrong behaviors unintentionally.
- Praise in public, correct in private: For small errors that are broadly applicable, it may be appropriate to provide feedback in the moment. However, in many circumstances, a private space is best. When giving constructive feedback it is important to focus on specific, directly observed behaviors that are actionable. Eliminate judgment and remain as objective as possible.
Example: “I observed that you rolled your eyes and crossed your arms when we discussed myocardial infarction as a possible cause of this patient’s chest pain.” In contrast to:
“You were not happy when we discussed…”
What About Bedside Teaching and Procedural Teaching?
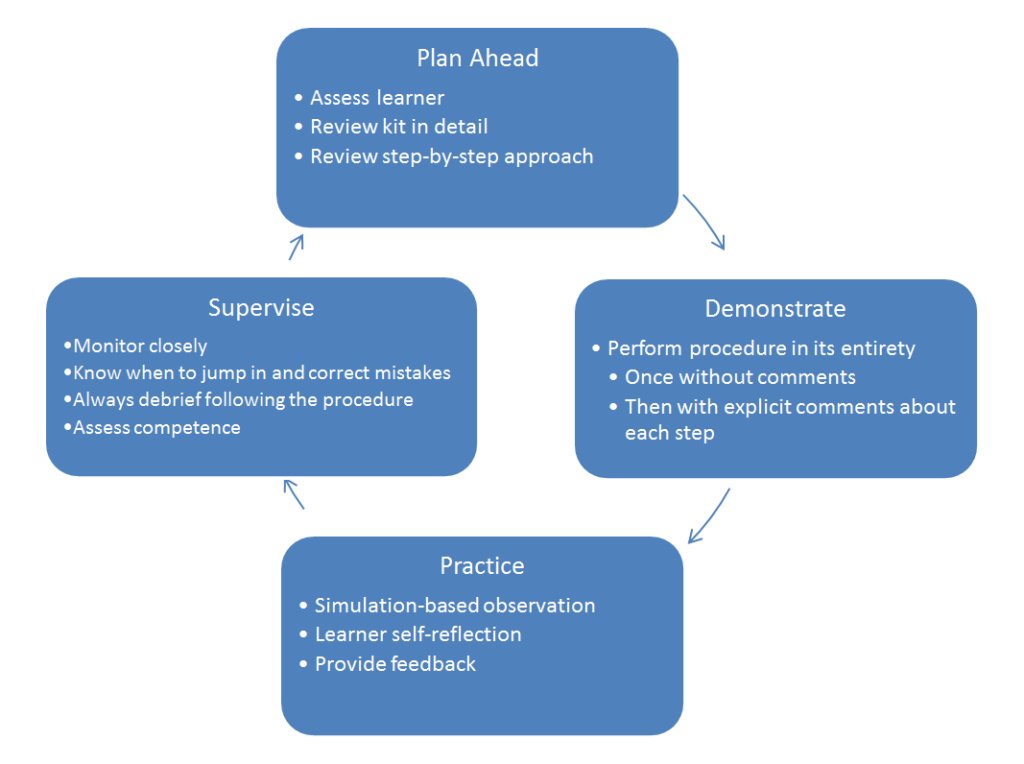
Two common clinical teaching scenarios are bedside teaching and teaching medical procedures teaching. Both rely on similar elements as clinical teaching.
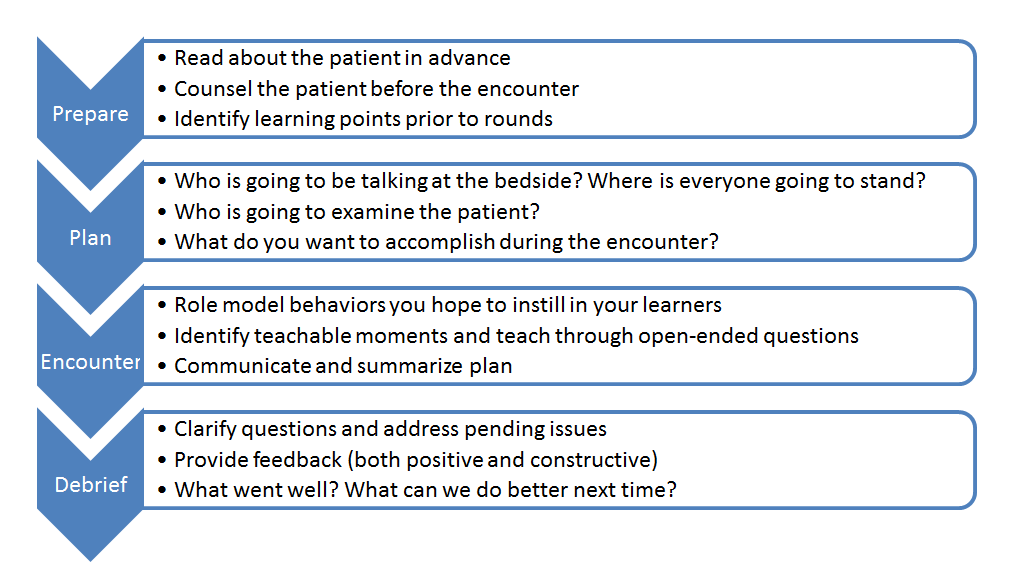
Bedside Teaching: You may be concerned or anxious about bedside teaching and how you will be able to impart knowledge. Consider some of the following myths and facts about bedside teaching as you start incorporating teaching in your role as a resident.
Myths and Facts about Barriers to Bedside Teaching
| Myth | Fact* |
|---|---|
| Takes too long | Bedside rounding does not take any longer than walk rounding |
| Patients feel uncomfortable | Patients prefer bedside rounding. Patients report:
|
| Not educationally valuable | Allows observer to assess (diagnose) the learner Provides opportunity for skill development Allows directly observed feedback Allows role-modeling behaviors |
(*References: J Gen Intern Med 2013; J Gen Intern Med 2010; N Engl J Med 1997)
A Guide to Bedside Teaching
Teaching Medical Procedures
(Adapted from Brodsky D and Smith CC. Educational Perspectives. Neoreviews 2012.)
Conclusion
Although you may not realize it, you teach through all your words and actions. Lead by example; learners are constantly watching your behavior and learning from you. In fact, they are likely to learn more by observing you than from your prepared content (educators call this the “hidden curriculum”).
Instill the behaviors you want learners to emulate by modeling those behaviors effectively. Always be thoughtful of your words and actions in front of learners. Avoid derogatory comments about patients or other services. Maintain a positive attitude, even in the face of challenges. Maintain calm and confidence in the midst of busy call days and sick patients. Describe your own actions to highlight subtle behaviors you hope to teach.
Example: “Why do you think I pulled up a chair and sat at the bedside with the patient when discussing the need for anticoagulation…?”
Ask for feedback from your learners and always debrief with your team. Doing so instills a culture of self-reflection and ongoing improvement. Ask for input on your teaching and finish the day by working on team dynamics.
Example: “What is going well?” “What can we do better?“
“Are your learning goals being met?” “How can I better meet your learning goals?”
Teaching is one of the great joys of medicine and a highlight during hectic days of patient care. Have fun teaching; there is no substitute for enthusiasm. Be innovative, try novel techniques, and think outside the box. Solicit feedback from your learners and continue to refine those techniques. Find what works for you. You will be most successful when you are comfortable and excited to teach; don’t force things and doesn’t worry about being like someone else.
Finally, go to “the balcony” by observing others teach and ask yourself what works and what doesn’t. What engages me or bores me and why? Identify specific skills, behaviors, and techniques and incorporate them into your own practice.
 Dr. Christopher Smith is a general internist in the Division of General Medicine and Primary Care at Beth Israel Deaconess Medical Center and an Associate Professor of Medicine at Harvard Medical School. Dr. Smith completed the Rabkin Fellowship in Medical Education at the Shapiro Institute for Education and Research and Harvard Medical School. He is the Director of the Internal Medicine Residency Program at BIDMC, and the Director of the Clinician Educator Track for residents.
 Dr. Daniel Ricotta is an academic hospitalist at Beth Israel Deaconess Medical Center and Instructor in Medicine at Harvard Medical School. Dr. Ricotta is currently a Rabkin Fellow in Medical Education at the Shapiro Institute for Education and Research and Harvard Medical School.
NEJM Resident 360 supports medical residents with the essential information they need to successfully and confidently navigate residency and beyond. Explore Rotation Prep, Learning Lab, Resident Lounge, Career, and Student Corner, or join a Discussion.
Read more about education and learning on the NEJM Knowledge+ Learning+ blog:


OUTSTANDING!
This is a *fabulous* article, thank you both for going through this in such a clear and helpful manner.
In my opinion, the keys in what you outline include preparation (preparation, preparation etc).
Another: correct your learner in private so as to ensure the safe space of teaching is not damaged by publicly correcting their mistake(s).
Finally, I *love* the suggestion that the supervisor describes the things they observed rather than their judgement (“I observed”, not “you seemed”).
I will be sending a link to my juniors as this is a wonderful summary. Thanks!